Drainage around the house: when it saves you, when it's a waste of time, and what drought has to do with it
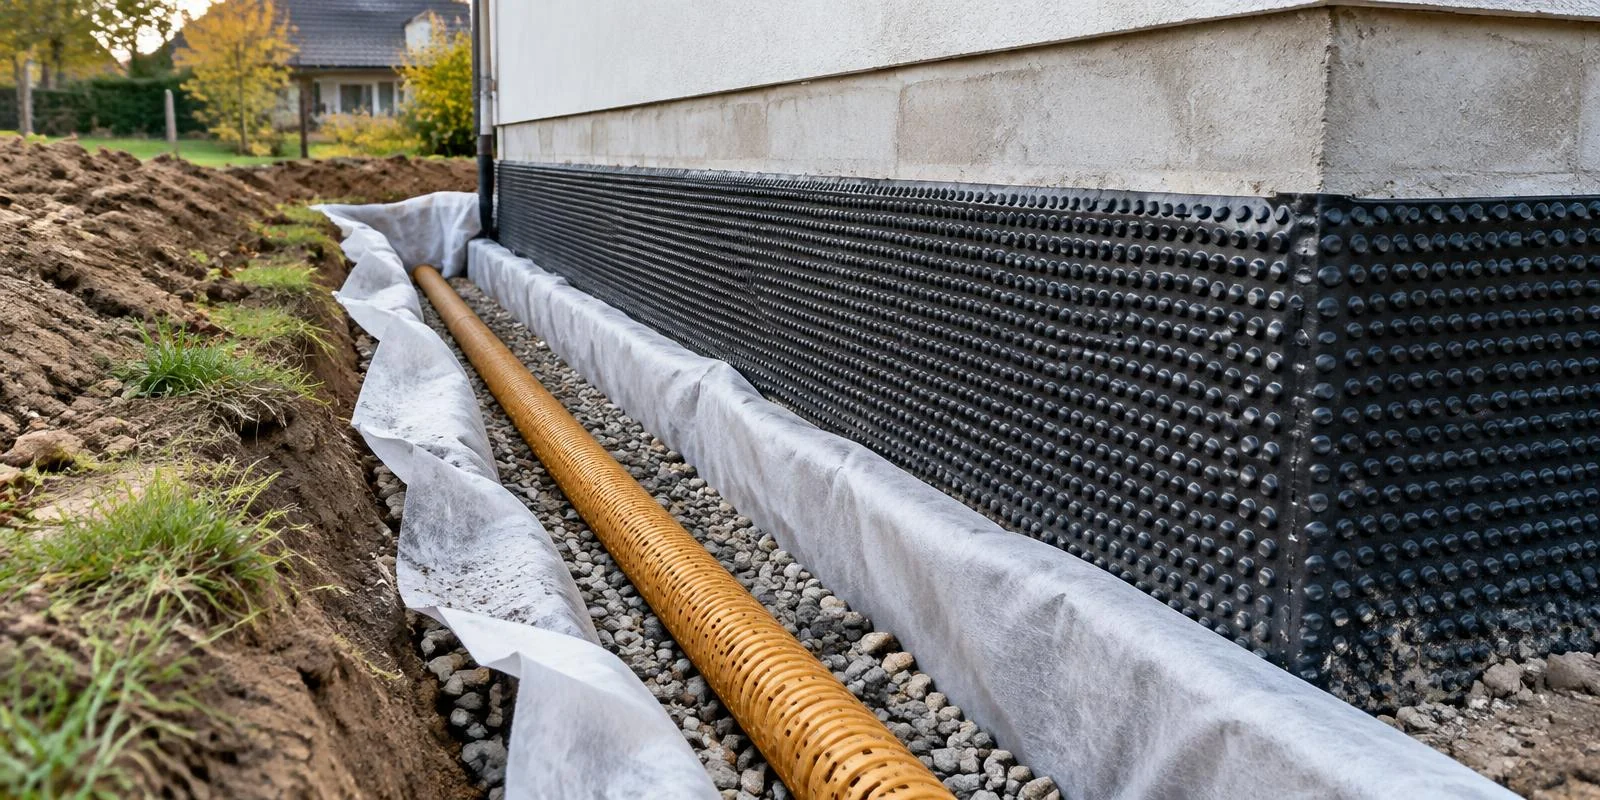
Drainage around the house can rescue a damp cellar, or it can be an expensive trench that leaves everything just as wet as before. This article helps you work out whether your house really needs it, how it works, which gravel, pipe and membrane to buy, where the water should go, and why you shouldn't send it down the drain in a dry summer.
On this page
- Drainage in a nutshell
- Water is like your mother-in-law
- Do you even need drainage? The five-minute test
- When you don't need drainage (and someone will try to sell it to you anyway)
- When drainage isn't enough
- The most common mistake: downpipes connected into the drainage
- How drainage works, without the textbook
- The one thing that, if you get it wrong, leaves you with an expensive underground hose that does nothing
- How deep?
- Dimpled membrane: superhero or just extra plastic?
- How to fit dimpled membrane
- Which gravel, which pipe, and what else to buy
- Where to send the water the drainage collects
- Soakaway: how far from the house
- And now for the drought
- Drainage around an old house
- Step-by-step process
- DIY or call in a contractor?
- Frequently asked questions about drainage
- What gravel should I use for drainage around the house?
- Where should the drainage end?
- Is dimpled membrane enough without drainage?
- Can I connect the roof downpipes to the drainage?
- How far from the house should a soakaway be?
- When is the best time to put in drainage?
- Will drainage help with a high water table?
- Final thoughts
- Related articles
Drainage in a nutshell
Drainage around the house is a perforated pipe laid in gravel that catches water in the ground next to the foundations and carries it away before it can push its way into the walls. You need it on clay soil, on a slope, if the house has a cellar or basement, and on an old house with damp at the base of the walls. You don't need it on sandy soil, on flat ground with no cellar, or where the real culprit is badly sorted gutters and downpipes. Drainage isn't waterproofing. It's waterproofing's sidekick. And one more thing people forget: the water you collect doesn't have to go down the drain. In a dry summer you'll want more of it than you think.
Water is like your mother-in-law
When you invite her, it's lovely. She waters the garden, fills the water butt and generally makes herself useful. When she turns up uninvited and moves into the cellar, you have a problem that won't sort itself out. Drainage is a polite way of showing her the door.
But hold on. Sometimes drainage is exactly what a house needs. Other times it's an expensive trench that leaves the cellar just as damp as before, except now the garden is dug up and your bank balance is lighter. Let's work out which is which before you book the digger.
Do you even need drainage? The five-minute test
Before you start digging, take a walk round the house. Ideally during or just after rain, with an umbrella and a cup of tea. Look out for these:
- Tide marks and white deposits on the base of the walls or in the cellar. White salts, flaking plaster or render, a dark band just above ground level. The masonry is soaking up water from somewhere.
- Puddles next to the house that are still there a day after the rain. The water has nowhere to go and sits exactly where you don't want it.
- Clay soil. If the soil sticks to your spade like Plasticine and cracks open in summer, you've got clay. Clay barely lets water through, so it collects against the foundations.
- A house on or below a slope. Water coming downhill will find a way, and your house is standing in it.
- A cellar or basement. The deeper the house sits in the ground, the more contact it has with water.
If you haven't ticked a single box, you very probably don't need drainage. If you've ticked two or more, read on carefully.
When you don't need drainage (and someone will try to sell it to you anyway)
A house on flat ground, with no cellar, on sandy or gravelly soil that drains naturally. Here drainage often just rearranges the garden for no good reason. The same goes if the only cause of damp at the base of the walls is rainwater splashing out of the downpipes onto the wall, or ground that slopes towards the house. That's cheaper and quicker to fix: connect the downpipe to a proper pipe, regrade the ground so it falls away from the house, and add a gravel or paved strip along the wall.
Honestly: half of all 'groundwater problems' are really a downpipe that stops half a metre short of the wall. Fix that first. If it's still wet afterwards, you've got a genuine reason to dig.
When drainage isn't enough
If you have a high water table that rises up to the cellar floor in winter and spring, drainage won't save you. You can't pump that sort of water away with a pipe. It would run forever and, if anything, draw water towards the house. What you need here is a watertight basement or tanking designed to resist water pressure, and that's a decision for a designer or structural engineer, not the neighbour with a digger.
The most common mistake: downpipes connected into the drainage
Remember this, even if you forget everything else in this article. Rainwater from the roof does not belong in the drainage.
Drainage is designed to slowly collect water seeping through the ground. In a proper downpour, your roof sends hundreds of litres down the downpipe in a few minutes. Connect that to a perforated pipe and the pipe will do exactly what it was made for: hand the water out into the gravel. Only this time it's handing it straight to your foundations. Congratulations, you've built an underground cellar irrigation system.
Run the downpipes through a separate solid pipe with no holes to a soakaway, a tank, or the sewer if the sewerage company allows it. The drainage can end up in the same place, but it gets there by its own route. For how the downpipe itself is fitted, see the item fitting a downpipe.
How drainage works, without the textbook
Picture a pipe with holes in it, laid next to the foundations, covered in gravel and wrapped in fabric. Water seeping through the soil towards the house hits the gravel. Gravel lets water through more easily than soil, so the water would rather drop into the pipe than push into the wall. The pipe runs on a gentle fall and carries the water somewhere it won't cause trouble.
There are four components, and each has its job:
- Perforated drain pipe - usually 100 mm in diameter. Plenty for a family home.
- Gravel - washed, with no sand or soil. It builds the water a motorway to the pipe.
- Geotextile - a non-woven membrane wrapped round the gravel. It lets water through but holds back fine soil that would otherwise silt up the drain within a few years.
- Inspection chambers - at the corners and wherever the pipe changes direction. They let you check the drain and flush it out with a hose if needed.
The one thing that, if you get it wrong, leaves you with an expensive underground hose that does nothing
That's the fall. Water only runs downhill, however much we might like to explain things to it differently. The pipe must keep dropping along its entire length, by at least half a centimetre per metre and preferably more. One spot where the pipe kinks upwards or runs flat and you've got a little underground pond slowly filling with silt. Check the fall with a level or a laser, not by eye on the basis that 'it looks about right'.
How deep?
The pipe goes alongside the foundation, no lower than the underside of the footing, never below it. If you dug it in below the footing, water could start washing soil out from under the house, and that's not drainage any more, that's undermining your own home. At the same time the pipe should sit below the level of the cellar floor, otherwise the water will simply go round it. The exact depth depends on how deep your foundations are, so there's no single number that works for every house.
Dimpled membrane: superhero or just extra plastic?
Dimpled membrane is the most searched-for term in this whole subject, and also the most misunderstood. It's that black or brown plastic sheet covered in little studs that looks like an egg box for giants.
What it does: it protects the wall's waterproofing from being damaged by stones and gravel during backfilling. It leaves a small air gap between the wall and the membrane, so the wall isn't in direct contact with wet soil and water can run down the membrane to the drain.
What it doesn't do: it isn't waterproofing. Stretch dimpled membrane over bare masonry with no waterproofing, backfill, and you've buried a sheet of plastic that made you feel better. The wall needs proper waterproofing first, and the membrane then protects it.
How to fit dimpled membrane
- Standard dimpled membrane goes studs facing the wall. If the membrane has a geotextile bonded to it, follow the manufacturer's instructions, as the method is often different.
- Overlap the sheets so water can't get behind the membrane.
- At the top, above ground level, finish the membrane with a top edge trim. Without it, rainwater runs in from above straight behind the membrane, which is precisely where you don't want it.
- At the bottom, the membrane goes right down to the drain, so the water running down it has somewhere to go.
Which gravel, which pipe, and what else to buy
At the builders' merchant there's a rack of ten different pipes and someone very happy to sell you all of them. Here's what you actually need for an ordinary family home:
| Material | What to choose | What to watch out for |
|---|---|---|
| Drain pipe | Perforated, 100 mm diameter | In fine clay or silty soil, a pipe with a geotextile sock is worth it |
| Gravel | Washed, 20-40 mm or 10-20 mm | Not MOT Type 1 or ballast with sand, as they slow the water down |
| Geotextile | Non-woven, wrapped round the whole gravel bed | Without it the drain will silt up over time |
| Inspection chambers | At the corners of the house and at changes of direction | You need to be able to get into them in ten years' time |
| Pipe for downpipes | Solid, unperforated | Runs separately, not through the drainage |
| Dimpled membrane | With top edge trim | Only as protection for the waterproofing, not instead of it |
If 'pipe with a geotextile sock' and 'geotextile round the gravel' sound like the same thing twice, you're only partly right. In decent soil, one of the two is enough. In clay, which loves to clog up everything in sight, it's worth having both.
Where to send the water the drainage collects
This is the question most often forgotten at the planning stage, and without an answer there's no point digging. Drainage only collects water. It has to hand it over somewhere. There are four options:
- Soakaway or soakaway crates - the water goes back into the ground, but further from the house. Works well on soil that drains.
- Sump chamber with a pump - for when the water can't be taken away by gravity, for example with a house sitting in a dip or with a deep basement.
- Rainwater tank - the water stays on your plot and you use it on the garden.
- Surface water sewer - only if there is one in your street and the sewerage company agrees to the connection.
Drainage does not belong in the foul sewer. The sewage treatment works doesn't appreciate you sending it half your garden every time it rains.
Soakaway: how far from the house
Far enough that the water doesn't come straight back to the foundations you've just drained. A distance of several metres is usually recommended, and at least three metres from the foundations is often quoted. The exact distance and the size of the soakaway, though, depend on how quickly your soil absorbs water. A percolation test will tell you: dig a hole, fill it with water and measure how fast the level drops. On clay you may be waiting a long time, and a soakaway may not work there at all. In that case a tank or a connection to the surface water sewer is the better bet.
And now for the drought
It's a bit of a paradox. Through the wet autumn and winter we're trying to get water as far from the house as possible, and come summer we're standing there with the hose, eyeing the water bill and wondering whether a hosepipe ban is on the way. Summers increasingly bring weeks without rain followed by one thunderstorm that lands all at once and runs off before the garden has even noticed.
A quick calculation that surprises most people: every millimetre of rain means one litre of water for every square metre of roof. A 100 m² roof in one decent storm of 20 mm sends around 2,000 litres down the downpipes. Annual rainfall across the UK varies a great deal, from roughly 600 mm in the drier east to well over 1,500 mm in the wetter west and uplands, so a roof like that sheds tens of thousands of litres a year. That's a lot of watering that can go down the drain, or into the garden.
That's why it pays to think about drainage and rainwater together:
- Roof water goes through a separate pipe into a tank. The overflow from the tank carries on to a soakaway.
- Water from the drainage goes to a soakaway, or into the same tank if it's clean enough and the tank is designed for it.
- The plot holds on to water instead of getting rid of it as fast as it can.
One more practical point. For new builds and renovations it's increasingly expected that you deal with rainwater on your own plot, and if you send it into the public sewer, your water company may charge you for it. What exactly applies to your property is something your local authority's building control or planning department, or your water and sewerage company, can tell you. Ask before you decide where the water will go.
Drainage around an old house
Digging round a fifty-year-old house isn't the same as on a new build. Older houses often have shallow foundations, sometimes stone and with no damp-proofing whatsoever. If you dig out the whole perimeter of a house like that down to the base of the footing in one go, you can take away the support it's relied on for decades. The house may not see the funny side.
So with an old house:
- Dig in sections, not the whole perimeter at once. Dig a section, do the work, backfill, move on.
- With shallow or damaged foundations, talk to a structural engineer first. It costs less than repairing cracks.
- Once the wall is exposed, make the most of it. Clean it, let it dry out and add waterproofing. On an old house, drainage without waterproofing helps, but only halfway.
- Deep trenches next to the house need supporting against collapse, and at a depth of around two metres you won't get away without trench shoring.
And be patient. Masonry that's been soaking up water for years won't dry out over a weekend. You'll see the result after a season rather than after a week. If the damp has already made it indoors, have a look at our article how to get rid of damp and mould in your home.
Step-by-step process
So you know what you're in for, whether you're doing it yourself or keeping an eye on a contractor:
- Find the cause. Downpipes, ground levels, soil type, water table. Without that you're digging blind.
- Decide where the water will go. Soakaway, tank, sump chamber, sewer. And find out what you're allowed to do.
- Dig a trench round the house down to the base of the footing, in sections on an old house. On a long perimeter, machine trench digging saves your back, and in tight spots it's down to hand digging.
- Clean and check the wall, then repair or add waterproofing.
- Fix the dimpled membrane with a top edge trim above ground level.
- Line the bottom of the trench with geotextile and a layer of gravel, shaped to give you the fall.
- Lay the perforated drain pipe, check the fall with a level or laser and fit inspection chambers at the corners.
- Surround the pipe with gravel and wrap it in geotextile.
- Run the downpipes through a separate solid pipe, not into the drainage.
- Backfill with soil and grade the ground so it falls away from the house. A gravel or paved strip along the wall is a bonus that pays for itself.
For more on everything that comes under digging and backfilling, see the category groundworks.
DIY or call in a contractor?
Honestly: drainage isn't rocket science and plenty of people do it themselves. It's mostly hard graft and patience with the fall. If you've got a new build on reasonable soil, a hired mini digger for the weekend and a brother-in-law who won't disappear at the first pile of spoil, it's doable.
Call in a contractor if:
- it's an old house with shallow foundations,
- you have a deep basement and the trench will be deeper than about a metre and a half,
- you need a sump chamber with a pump,
- you've no idea whether you've got a high water table or just bad downpipes.
And if you do call someone in, ask them three things: where will the water go, how will they check the fall, and where will the inspection chambers be. If you hear 'we'll see' in answer to any of them, keep looking.
Frequently asked questions about drainage
What gravel should I use for drainage around the house?
Washed gravel or clean stone, 20-40 mm or 10-20 mm. The important thing is that it's free of sand and fines. MOT Type 1 or a sandy mix compacts better, but it lets water through far less easily, which is exactly the opposite of what you want from drainage.
Where should the drainage end?
In a soakaway, a sump chamber with a pump, a rainwater tank, or the surface water sewer if the sewerage company agrees. Never into the foul sewer, and never in a way that sends the water back towards the house.
Is dimpled membrane enough without drainage?
On a dry, sandy plot, often yes, provided there's proper waterproofing behind it. On clay or on a slope, no. The membrane stops water at the wall, but it then has to be taken somewhere.
Can I connect the roof downpipes to the drainage?
No. Run the downpipes through a separate solid pipe. Otherwise, instead of draining your foundations, the drainage waters them.
How far from the house should a soakaway be?
Several metres is usually recommended, often at least three metres from the foundations. What really decides it, though, is the soil type and the result of a percolation test, so it's best to have it set out in the design.
When is the best time to put in drainage?
Outside the wet season and away from frosts, ideally in late summer or early autumn, when the ground is drier and the trench stands up. In winter and early spring, when everything is sodden, digging is harder and you'll have water standing in the trench.
Will drainage help with a high water table?
No. Drainage deals with water that seeps through the soil and collects next to the house. With a permanently high water table you need a watertight basement or tanking designed to resist water pressure.
Final thoughts
Drainage around the house is a good servant. Designed with some sense, it quietly carries water away for years and you forget it's even there. Done without a fall, without anywhere for the water to go and with the downpipes plumbed into it, it's an expensive hose buried in the garden. So first find out where the water is coming from, then decide where it's going. And if you can, don't throw it away. Come August, the whole garden will thank you.
Related articles

Rewiring a Flat: Costs, Process, and Signs You Need an Urgent Upgrade
Replacing old electrical wiring is often the most delayed part of a renovation, yet outdated electrics are the leading technical cause of domestic fires. In 2026, a full rewire starts from €952 for a studio flat up to €3,824 for a 5-bedroom property, with chasing channels costing between €5.70 and €8.50 per linear metre and plastering repairs at €7.30 to €10.90 per linear metre. In this article, you will learn when a rewire is essential, the step-by-step process, real-world costs, and common mistakes to avoid.

LED Lighting in Flats: Installation Costs for Strips, Spotlights, and Chandeliers
LED lighting is now the standard for every renovation and new build, compared to traditional bulbs, it saves 80 to 90% in energy and lasts for 25,000 to 50,000 hours. In 2026, LED strip installation costs between €7.70 and €11.50 per linear metre, recessed spotlights with hole cutting cost €18.30 to €27.50 per unit, pendant chandeliers €41.90 to €62.90, and wall lights €13.40 to €20.20. In this article, you will find real-world installation prices for all types of light fittings, how to plan your lighting during a renovation, and which mistakes to avoid.

Cost of Rewiring: Complete Price Guide by Flat Size
Electrical installation is one of the most critical and technically demanding tasks in both renovations and new builds. A full electrical installation and fit-out for a 1-bedroom flat in 2026 costs on average €952 to €1,428, for a 3-bedroom flat €1,435 to €2,153, and for a 5-bedroom property €2,603 to €3,824. In this overview, you will find real market prices based on property size, what the fit-out includes, the differences between flats and houses, and how to hire a qualified electrician with the correct certifications.